Boardroom Advisory Group, LLC

I was so very honored and grateful to become a member of Boardroom Advisory Group, LLC this past week. As quoted on their website, “Boardroom Advisory Group, LLC is a global, independent advisor network of CXO’s, business owners, and industry leaders specializing in a wide array of business disciplines who share a core focus; provide customers with innovative, comprehensive and high-quality solutions at a level of service exceeding expectations.” Take a moment and visit their website to learn more about how you can become part of this amazing network.

I received my MBA from Waynesburg University in 1995 and had a lengthy 16-year career at Waynesburg University as an Accounting Professor.  

I launched my own company, Charlotte Fashion Plate in September of 2015 to showcase my passion for both fashion and food.  I am very pleased by its success and strive on a daily basis to build my brand.  The work is very rewarding and fun.  I keep my focus positive and love the relationships I have built with my fellow entrepreneurs, local businesses, and social media followers. 

Thanks to Steve Driben of Boardroom Advisory Group, LLC , for the fabulous profile highlighting my career and for believing in me and my company and the direction I am heading in the future.  

My Executive Profile is available by clicking here. 


Homemade Turkey Gravy

For me, Thanksgiving comes only once a year.  So, when I prepare the meal, I take very few short cuts.  Gravy, to me, has to be rich and thick and definitely homemade.  You can prepare this recipe the day before and finish right before you serve.  After you taste this gravy, you will wonder why you ever bought gravy from a jar.  Thanks to my Momma!

In your local grocery store, search for either turkey thighs, wings, legs or a combination thereof.  I used turkey thighs for this recipe.  Heat to a medium high, 2 TBLS of butter and a TBLS of olive oil in a pan.  Season your turkey thighs with salt/pepper on both sides.  Dredge the thighs in a dusting of flour and add to the pan.  

Turkey thighs…

Brown both sides very well.  Be sure not to burn.  When turkey has browned, add 1/2 box of turkey or chicken stock.  I used turkey stock.  Start scraping the browned bits then turn heat down to medium to medium low.  Add about 4 whole stalks of celery.  Cover and allow to simmer for about an hour until the turkey is fully cooked.  Check about half way through and add a touch more stock if needed.  

Once the turkey is cooked, remove from pan along with the celery and discard.  Strain the liquid through a wire strainer twice.  I do this to ensure that no tiny bones are left in the gravy. Once strained, add liquid back into pan and scrap sides.  In a small bowl, make a cornstarch slurry.  Add about 2 TBLS of cornstarch to about 1 1/2 TBLS of liquid.  I used turkey stock as my liquid.  

Grab a whisk.  Turn heat up to medium high and slowly pour the cornstarch slurry in a little bit at a time.  You may not use the entire amount.  Whisk really fast as you are pouring in the slurry, so as to avoid lumps.  You will notice the gravy starting to thicken and become rich. Once the gravy has reached the desired consistency, no need to add more slurry.  Go slow with the slurry and fast with the whisk and be patient.  Turn off heat and serve with your homemade mashed potatoes and stuffing.  If you want to prepare the day ahead, cool down mixture after turkey is cooked then place entire pot in fridge.  In the morning, scrap off any excess fat, reheat, strain and follow up with the slurry.  


Beef Stroganoff

This classic dish is the ultimate in comfort food and brings back so many childhood memories. Here is my version…it’s super indulgent and decadent!

I’ve made this so many times and with so many different cuts of beef.  I have found that a ribeye/delmonico works best for this recipe.  Feel free to use whatever cut of beef you desire, but you may have to adjust cooking times for tenderness.  

Start by thinly slicing about two ribeyes.  Season with salt/pepper.  In a bowl, combine about 1 Cup of flour with additional salt/pepper.  It is really important to season at every stage.  Heat a few TBLS of olive oil in a deep pan.  Dredge the steak in the flour mixture, shaking off any excess and place in hot oil.  Allow the steak to brown really well, avoiding the burn stage. When the meat is almost brown, add one minced shallot.

Once the beef is beautifully browned, add about 3/4 box of Rachel Ray’s Beef Stock.  Start scraping the browned bits from the bottom of the pan.  You will notice it start to thicken. Adjust heat to a medium low and allow the beef to simmer until it becomes tender.  For a ribeye, this usually takes about 35-40 minutes.  Cook time to become tender vary for other cuts of beef, typically longer.  While the beef is simmering, prepare your favorite egg noodles to al dente. I like a broad noodle with this dish.  Add one large package of sliced button mushrooms and chopped parsley to the pan and allow to cook for about 5-7 minutes. I prefer my mushrooms to remain hearty, but you can cook them down as much as you desire. Taste sauce for salt…add more if needed.  If sauce is not gravy-like at this point, I typically add a slurry of corn starch mixed with a bit of the left over stock.  Prior to adding the slurry, turn the heat up to medium-high then use a slotted spoon and pour in the slurry stirring constantly so as to avoid lumpy gravy.  Once thick, remove from heat and mix in sour cream.  You are probably going to use about a Cup.  I just keep tasting along the way to make sure it has that creamy texture and desired taste.  Place cooked noodles in bowl and top with this fabulous sauce and ENJOY!

My Buttermilk Fried Chicken

Buttermilk Fried Chicken...
Buttermilk Fried Chicken…

Who doesn’t love fried chicken?  I love this recipe I created…the chicken is so crispy, tender, and juicy.  This recipe works with whatever part of the chicken you prefer.  I use boneless chicken breasts cut into strips and boneless chicken thighs.  I know what you are thinking…how can boneless chicken be fried and remain juicy…try this recipe…it works!  If you are using bone-in chicken, the fry time will be a little longer.  

Start by applying salt and pepper to your chicken pieces.  In a bowl, combine enough buttermilk to cover chicken with hot sauce or sriracha (I use a few squirts).  Add chicken to buttermilk mixture and marinate in the refrigerator for at least 15 minutes.  I typically marinate for 2 hours.  You can also do overnight.  The longer the chicken marinates, the juicier it will be.  

While the chicken is marinating, combine about 4 to 5 cups of AP flour (the amount will vary depending on how much chicken you are preparing), 3/4 cup of rice flour, salt/pepper, cayenne, and ground celery seeds in a bowl.  The addition of the rice flour will make the chicken extra crispy.    

Flour mixture...
Flour mixture…

Heat up a cast iron pan with canola oil and a few pats of butter.  You want the temperature of the oil to be around 350 degrees.  Use enough oil to cover the chicken.  One key is to make sure you have enough oil in the pan…if you are frying in batches…you will need to add additional oil in between batches. Start coating the chicken by taking a piece from the buttermilk mixture and dipping in the flour mixture…be sure to fully coat each piece.  You may have to pat the flour on the chicken to make sure it’s coated.  I often double dip…meaning I will put back in buttermilk after the first flour then back in the flour…

Add coated chicken to hot oil and allow to fry and brown (for boneless chicken) about 7 to 8 minutes) a side.  

You can cut a piece of chicken to test if it is fully-cooked or use a meat thermometer…should be at least 165 degrees.  Once fully-cooked, drain fried chicken on paper towels to soak up any excess oil.  I usually have a pan heating in the oven while I’m frying the chicken and will place the finished chicken in the oven for a few minutes to ensure it is cooked through.  Oven temperature at 300 degrees.  Do not leave chicken in oven too long or it will begin to dry out. Salt the chicken immediately after it is removed from oil.  ENJOY!

Minestrone Soup

Fall is upon us and winter will be here before we know it.  I love soups of all kinds and this is one of my favorites…my take on Ina’s Garten’s Winter Minestrone Soup.  

Minestrone Soup
Minestrone Soup

Start by bringing a pot of salted water to a boil.  Heat about 2 Tablespoons of olive oil in a soup pot.  Add about 3 Italian hot sausage links (out of casing) and about 6 strips of thick cut bacon (cut into small pieces) to the heated oil and brown.  Once meat is browned, add one small shallot diced, 1/2 cup carrots diced, 1 zucchini diced, 4 to 5 cloves of minced garlic, and fresh thyme leaves.  At this point, I also add about 3 celery stocks with leaves.  You can dice the celery and leave in soup, I just prefer the flavor and will remove once soup is finished.  Cook for about 10 minutes to soften the vegetables.  Add one box of chopped/diced tomatoes, 6 Cups of chicken stock (I use Rachel Ray’s), 2 to 3 bay leaves and salt/pepper.  Allow the pot to come to a boil, reduce heat and simmer for about 25 to 30 minutes.  

Add your favorite small pasta to the boiling salted water.  I prefer Barilla’s Mezze Penne.  Cook to just al dente.  Drain and set aside.

When soup has simmered and vegetables are softened, remove the bay leaves and celery stalks and discard.  Add two cans of cannellini beans (drained and rinsed).  Add one big bag of baby spinach leaves and prepared pesto.  I love She’s Pesto.  She is local to Charlotte.  Two to three frozen cubes of her homemade pesto is perfect for this soup.  If soup is too thick, add a bit more chicken stock.  Taste for salt…add more if needed.  Serve in individual bowls and top with Parmesan cheese, a drizzle of olive oil, and fresh chiffonades of basil. 

Cast Iron Skillet Seared Scallops with a Cayenne Corn Puree

This is by far one of my favorite dishes to prepare and to serve guests.  Once you learn the technique to prepare scallops, you will wonder why you don’t make them at home more often. You want to start with super-fresh scallops.  I buy mine locally from The Carolina Fish Market. They are so big and meaty.  The recipe for the Cayenne Corn Puree follows.  You can actually prepare both at the same time.

I start by rinsing my scallops and pulling off the tiny piece of muscle on the side.  I place on paper towels to dry thoroughly.  The key to a great sear on a scallop is to be sure to dry as much as possible.  Season dry scallops with Salt and Pepper.  

Grab a cast iron skillet and allow to heat to a medium high.  I do coat my pan with just a touch of olive oil or butter.  When the pan is super hot, place about 4 to 5 scallops in pan…do not overcrowd…you can cook in batches if need be.  Allow the scallops to sear on one side for about 2 to 3 minutes depending on the size…as much as you may want to…DO NOT TOUCH…just allow them to sear.  When seared on one side, flip and sear the other.  Be sure not to overcook.  The more you do this, the better you will become at just knowing when the scallop is fully cooked and tender.  


Do not touch for a few minutes...allow to sear nicely one side...
Do not touch for a few minutes…allow to sear nicely one side…
Seared Scallops
Seared Scallops

Now for the super, simple Cayenne Corn puree.  Crisp up about 6 pieces thick bacon cut into tiny pieces and drain.  If you can find freshly picked corn, grab about five to six ears and cut the kernels off.  If corn is out of season or you can’t find fresh picked, then you can use canned corn.  I prefer Green Giant White Shoepeg Corn.  As you are heating up your cast iron skillet, grab a pot and combine 1 Cup of Heavy Whipping Cream, the corn, salt and pepper, 2 to 3 Tablespoons of butter, and cayenne pepper (I usually use about one teaspoon, but you can definitely use more/less depending on your preferred heat level).  Allow the pot to come to a boil and boil for about 5 to 6 minutes.  Keep a watch that the pot does not overflow.  At this point, take an immersion blender and blend all ingredients in the pot.  If the mixture seems too thin, then just drain a bit of the liquid out prior to blending.  You can also use a food processor.  If you do not want the pieces of kernels in your finished product, then you can strain after blended.  I prefer not straining. Add about 3/4 of the bacon pieces to the blended mixture.  To plate for individual servings, I use a flat, wide bowl and pour part of the mixture in the bowl and top with 3 to 4 of your seared scallops.  Top with extra bits of bacon and fresh chopped parsley.


Seared Scallops with a Cayenne Corn Puree

Hot and Sour Soup

Hot and Sour Soup is one of my favorite soups to order in an Asian restaurant.  I have finally perfected it by using a variation of a recipe I found from easy-souprecipes.com

Here is how I make it…

I have tried hot and sour soup everywhere…some I have loved and others, not so much.  This recipe is all about taste for me…so I just keep tasting during preparation until it’s right.  So, I must admit, I do cheat a little bit…I buy an already prepared applewood smoked pork loin from Harris Teeter.  It is full of flavor and really makes this recipe easier.  This soup can be prepared in about 20 minutes.  I start by heating, almost to a boil, one box of Rachel Ray’s Chicken Stock.  Once heated, I add the pork, which I cut into strips, about a teaspoon of garlic chili sauce (add more or less depending on your desired heat level), 1 to 2 jars of shiitake mushrooms (drained and rinsed), and about 1/2 cup of low-sodium soy sauce.  Initially, I add about 1/2 cup of the soy sauce, but may add more later if need be.  Allow all of these ingredients to simmer for about 8 to 10 minutes.  

Add about 1/2 teaspoon of ground white pepper, one small can of bamboo shoots (drained, rinsed and cut into tiny strips), and about 1/2 Cup of white vinegar. You can also add tofu at this point, if you prefer.  I typically do not. Mix around a little, then give it a taste…you may have to add just a touch more soy sauce and/or vinegar..again…this recipe is all about taste. When you get it to the desired taste, mix about 1 to 2 Tablespoons of cornstarch with just a bit of water in a small bowl to make a slurry (not too thin). Bring the pot to almost a boil, then add the cornstarch slurry, all the while mixing with a slotted spoon.  Soup should start to become thicker, just to an almost gravy-like consistency.  In a small bowl, beat an egg white with a fork and add to soup, mixing as you pour it in.  You will see the egg form thin white ribbons throughout the soup.  Lastly, ENJOY!  I like mine with a little bit of rice. You can also substitute the pork with tofu for a vegetarian version. 

My Momma’s Chili (Soup)

We all have our favorite kind of chili, whether it be spicy, thick, with beans or without.  This is the one I grew up on, just updated to a healthier version.  I think of it more as a “chili soup” rather than your typical chunky, thick version.  

Here, is how I make it.  Start browning one pound of ground turkey breast with a bit of olive or canola oil. You can use ground chicken or ground beef.  Season with about 2 to 3 TBLS of chili powder, salt and pepper.  Add about 1/2 diced red onion.  When the meat is browned and onions have sweated, pour in one large bottle of V-8 juice.  I use the traditional version of V-8 juice, but you can definitely use a lower sodium version.  Add large stalks of celery, including the leaves.  This adds flavor.  If you prefer celery as part of the finished product, you can dice and add to pot.  Add one can (undrained) each of dark red kidney beans, light red kidney beans, white kidney beans and chili beans.  Add hot sauce to your liking.  I use Tabasco Sauce. Allow to slowly simmer for about 20 – 30 minutes.  Do not boil…you want to maintain the integrity of the beans.  Add chopped parsley to the pot. Serve with shredded cheese, sour cream, or any of your favorite chili toppings.  A grilled cheese sandwich is also a perfect partner.  This recipe makes a lot.  Leftovers freeze very well.  

Fox 46 Good Day Charlotte Food Segment – Poolside Bites

Peter Carey and myself were featured on Fox 46 Good Day Charlotte on July 23rd. Peter Carey is a lifestyle guru and my partner in Fashion and Food.  Peter’s businesses include, PAC public relations, and Fashion D’ Lux. In this segment, we highlighted poolside bites and poolside fashion.  Peter and I make a tremendous team! We have so much fun working together. He has a great eye for fashion, and is a great partner.  

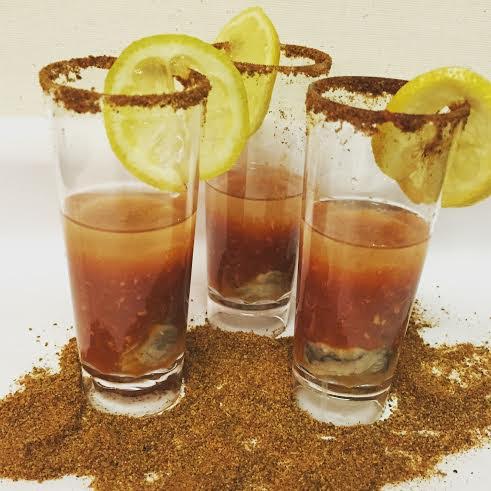
Pictured above, are my Oyster Shooters. My inspiration for these shooters came from Pearlz Oyster Bar.

You will need shucked oysters (Carolina Fish Market can do this for you), Black Pepper vodka, cocktail sauce, horseradish, Old Bay Seasoning, lemon, and hot sauce. 

Rim the shot glass with lemon, dip in Old Bay Seasoning and garnish with lemon. Place shucked oyster in shot glass (use plastic if you are going poolside). Pour 1 oz. of Black Pepper Vodka into each glass. Mix Cocktail sauce, horseradish and hot sauce to taste in a bowl.  Spice level can be adjusted up or down depending on your taste. Spoon about 1 oz of the cocktail sauce mixture into each shot glass shot and serve. I like to make these ahead of time and chill in the refrigerator.

Next, I prepared Wine Soaked Frozen Grapes.

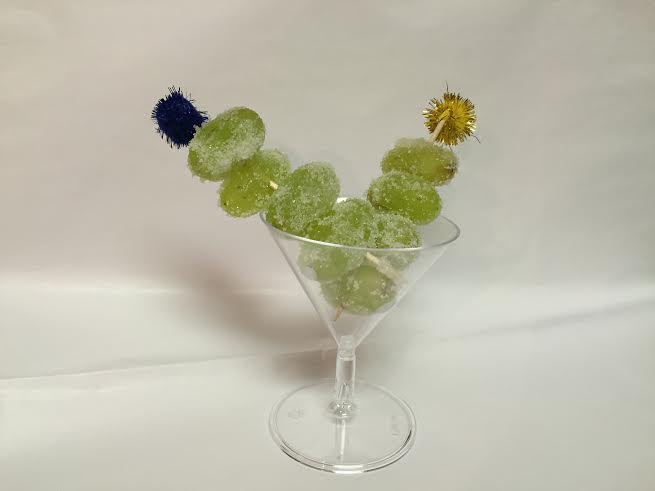
All you need is 1 bunch of white grapes, 1 bottle White Wine (I use Sauvignon Blanc), and sugar for coating.

Soak the grapes in white wine overnight. Then toss in sugar and freeze for about 2 to 3 hours. Place on a pedestal to serve or you can load them on individual skewers.

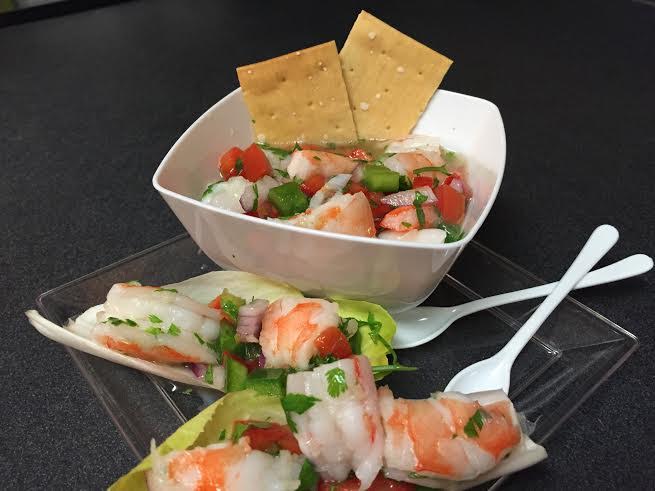
Lastly, here is my recipe for Shrimp Ceviche. It’s easy to make, light and refreshing.

You will need 1 to 1 1/2 lb. 16/20 count uncooked deveined shrimp (you can use cooked shrimp and just skip the cooking process), one jalapeno diced (optional, depending on your taste), 1 each red & green pepper diced, ½ small red onion diced, 1 can coconut milk, 1 cup seafood stock, 2 plum tomatoes (seeded and diced), 1 bunch cilantro chopped, juice of 8 to 10 limes, juice of 3 to 4 lemons, juice of 1 orange, Olive oil and Salt/Pepper to taste. You can serve your ceviche in bowls, in endive leaves, or with tortilla chips.

First, heat the coconut milk and seafood stock in a pot almost to a boil, add shrimp and cook until they just turn pink. Remove shrimp and allow to cool. In a bowl, combine the diced vegetables, lemon, lime and orange juice, and chopped cilantro.  Add a touch of olive oil for texture. Gently mix in cooked shrimp that has been cut into three pieces per shrimp. Season with salt and pepper to taste. You can prepare this and all of the other recipes above, a day in advance. 

All of these cute little plastic party plates and serving dishes were found at The Party Store


Baked Stuffed Clams with Bacon

Here’s the recipe for my most recent creation: Baked Stuffed Clams with Bacon.  Start by soaking 2 dozen clams, that you can find locally at the Carolina Fish Market, in a mixture of flour and water for about 15 minutes. Then heat a large can of clam juice and one cup of white wine in a deep pan, bring to boil. Rinse clams, add to broth mixture and cover. 
As the clams open, remove from pan immediately. Once all clams have opened and been removed, let cool. Discard cooking liquid. In the meantime, crisp up chopped bacon and set aside. Pour 1 cup of heavy whipping cream into a bowl, add salt, pepper and red pepper flakes. Cut up about 5 or 6 slices of crusty bread and place in the cream mixture, allow to soak for about 15 minutes. Add one small diced shallot, about 1 cup of Parmesan cheese, and chopped canned clams and fresh chopped parsley to this mixture.  Remove the cooked clams form the shell, chop and add to mixture. Create vessels from the shells of the clams by pulling apart the clam shells. Add the bacon to the bread mixture and form a stuffing like consistency. If the mixture is too moist, add a bit more Parmesan cheese. Fill each 1/2 clam shell with the mixture and bake in a 350 degree oven for about 10 minutes or until they are nice and golden brown. Garnish with extra chopped parsley and serve with fresh lemon wedges.